
Initially, I had planned to blog about the shortcomings of the vector brush in Serif’s Affinity Designer (Window version), which we purchased a short while ago. However, after posting on the Serif forum about it I’ve decided to shelve that and give Affinity a fair shake. While it may not be an Illustrator killer just yet there is a lot love about this, and that’s with barely a cursory use.
Reproducing an isometric vector in Affinity Designer

To test my shiny new install of Affinity Designer, I’ve recreated a vector I made in Illustrator for the Oxfiniti case study.
It’s a pretty simple image, but I wanted to start small and see what the options are. To create the above image in Illustrator I used two approaches. First I created the three visible planes of the OxBox using SSR (scale, shear, rotate); a good tutorial for that can be found here. For the pipes I used 3D Rotate.


This seems to be the quickest route, rather than using the pen tool to make a grid with lines, and SSR to then give the faux-grid isometric properties and converting that to a guide grid. The main problem I have with this approach is that the grid never seems to be ‘quite right’. If I use 3D rotate and then draw with the pen tool the lines don’t seem to quite match up. Plus you need an enormous grid sometimes, which is time consuming to set up. My fairly short experiment with AD has left me very impressed with its approach.
The Grid
I love this. It really is quite special.

The grid is ludicrously easy to set up. View > Grids and Axis Manager brings up the below. Then uncheck Use Automatic Grid and switch to Advanced.
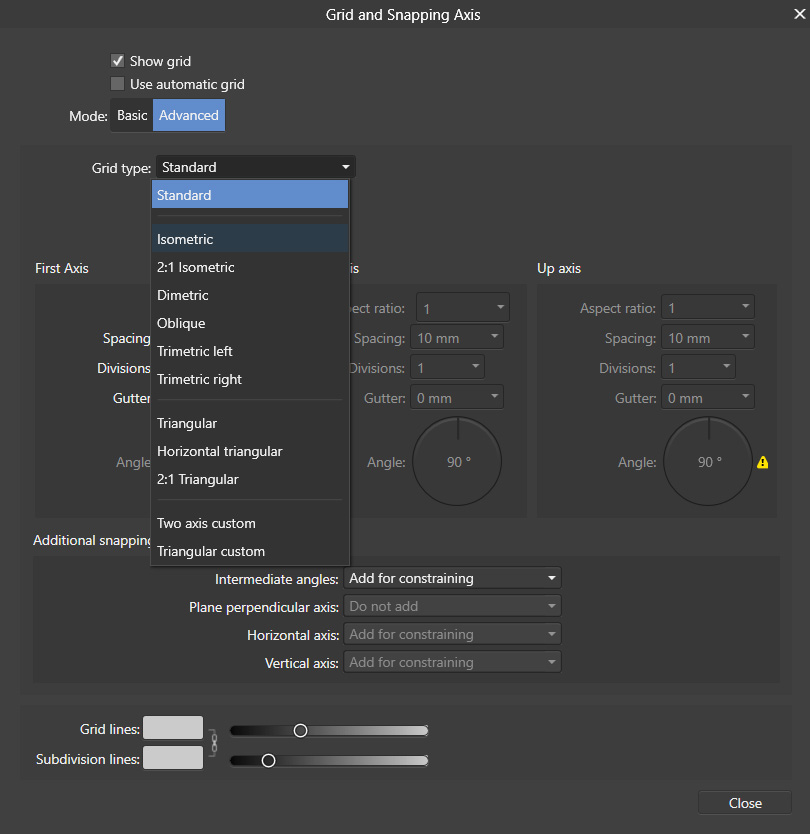
I also turned on Snap to Grid which made it really easy to keep my lines neat and accurate.
Overall I’ve found this a much more satisfying way to work with isometric linework and as I’m rather fond of isometric art I’m going to try to use this a lot more. While working, the axis guides flash up in a pleasingly smooth way, and the bounding box is also very helpful. Turning a shape such as a circle or square to isometric is simple – simply hover over the bounding box edge you wish to move and use the ‘skew’ arrows to realign the shape to the grid.

So far, I believe Affinity Designer is a bit of a no-brainer purchase.
Even at full price it’s just £39.99 which is extremely far south of the cost of Adobe’s subscription based purchasing.


Ah – but can I turn off the bounding boxes and keep them off ? You seen to have more experience than me .. and cannot find a method.
By the way – Hi
Hey Steve!
I’m not sure. I’ll have a look. There’s been a huge amount of improvements to the vector brush since I posted this, although converting from a path to a shape (expand in Illustrator) still brings up a horrendous amount of bezier nodes.
Hi Steve, I’ve been poking around both the release and the beta and there isn’t an ideal solution. You can only hide the bounding box in one of two ways. When selected, there’s an icon of an eye in the top tool bar which if you turn on will hide the BB if you move the object. Or, if you only want to hide it with a shortcut for the duration of the move, hold down the space bar as you move the selected object. I guess I’ve just learnt to ignore it.
My bugbear (amongst others) is not having an isolation mode. I find it distracting having to work inside a group without it.
Thanks, this helped out a lot for a project I’m working on (as well as using rotation and shear for text)